---
title: "Step by Step Guide to Custom Laravel Package Development"
url: "https://www.monocubed.com/blog/laravel-package-development/"
date: "2022-06-16T08:33:22+00:00"
modified: "2025-10-15T06:21:36+00:00"
type: "Article"
resource: "https://www.monocubed.com/blog/laravel-package-development/"
timestamp: "2025-10-15T06:21:36+00:00"
author:
name: "Yuvrajsinh Vaghela"
url: "https://www.monocubed.com/"
categories:
- "Laravel Development"
word_count: 734
reading_time: "4 min read"
summary: "Are you a Laravel developer or a beginner who wants to develop a Laravel Package on your own?
Already know about the Packages but don’t know the process?
Read this guide to know and underst..."
description: "Want to develop a Laravel Package from scratch? Refer to this guide, follow the 7 easy steps and learn about laravel package development today."
keywords: "laravel package development, Laravel Development"
language: "en"
schema_type: "Article"
related_posts:
- title: "Top 9 Powerful Advantages of Laravel Over Other PHP Frameworks"
url: "https://www.monocubed.com/blog/advantages-of-laravel-framework/"
- title: "Yii vs Laravel: Which Web App Framework to Choose?"
url: "https://www.monocubed.com/blog/yii-vs-laravel/"
- title: "Top 11 Laravel Development Companies in the USA"
url: "https://www.monocubed.com/blog/laravel-development-companies-usa-canada/"
---
# Step by Step Guide to Custom Laravel Package Development
_Published: June 16, 2022_
_Author: Yuvrajsinh Vaghela_
Are you a Laravel developer or a beginner who wants to develop a Laravel Package on your own?
Already know about the Packages but don’t know the process?
Read this guide to know and understand the **Laravel Package Development** process in easy steps.
Table of Content
1. [Custom Laravel Package Development in 7 Easy Steps](#laravel_package)
2. [FAQ About Laravel packages](#faqs)
3. [Conclusion](#conclusion)
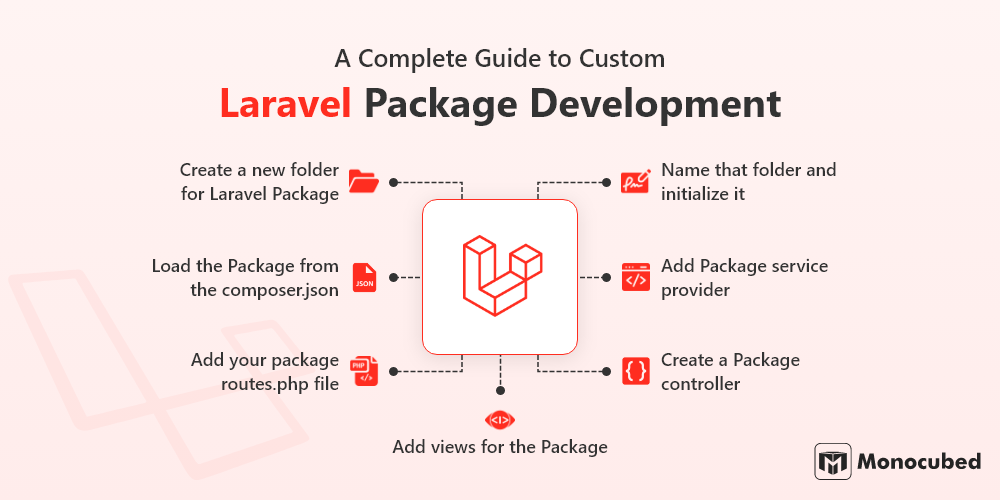
## Custom Laravel Package Development in 7 Easy Steps
Follow these 7 easy steps to create your own Laravel Package.
1.
### Create a new folder for Laravel Package
First, for your new project install Laravel on your PC.
```
Laravel new core ```
After the installation process, you have to create a new folder inside the root of your app.
Now, create a folder inside the package, which will be your vendor or company name. For an example here we will name it as “**Monocubed**”.
Then, in that folder, create another folder with the name of our Package **calc**.
After that, you will have to add one last folder named ‘src’ which is where the code of your package will lie.
In the end, your folder’s structure will be ‘**packages/monocubed/calc/src**’.
2.
### Name that folder and initialize it
For naming your folder first you have to open your command prompt and navigate it to the folder with your Package name, “packages/monocubed/calc”
And run the following,
```
Composer init ```
This is going to initialize the current folders as a composer package and for that, it will be asking you a series of questions to complete the setup of your Package.
After this process, you will be having a new file in your package folder named “**composer.json**”.
**What is composer.json?**
Composer.json is a **configuration file**, which explains your application, data and needs of your application. It is placed in a root folder of all PHP files.
Don’t worry if you don’t know any of the questions through the initialization steps, just press enter to skip it and you can add or edit this later.
The composer.json file is going to look like the below-given reference,
```
{ "name": "monocubed/calc",
"description": "Different calculation function",
"authors": [ { "name": "Example",
"email": "example@monocubed.com" } ],
"minimum-stability": "mono" } ```
The process of initializing the package is done here now, we need to give the command to the main app ‘composer.json’ to load it.
3.
### Load the Package from the composer.json
In every Laravel application, there is a main composer.json file at the root of every new application. Composer.json is the main file and this is only where you have to define all your dependencies.
Let us begin with autoloading the newly created package via the autoload block:
```
"autoload": { "classmap": [ ... ], "psr-4": { "App\\": "app/", "monocubed\\calc\\": "packages/monocubed/calc/src/" } }, ```
Now, you need a composer to run the autoloader and autoload your Package. For this process you need to run the following command:
```
composer dump-autoload ```
After that to optimize the class loader uses the following command, it’s not needed every time but as you are making it for the first time you need to run this.
```
Php artisan optimize ```
4.
### Add Package service provider
The service provider is the main entrance inside your package in php’s package management system. This is where your package is loaded.
At the root of our app, let’s create our ServiceProvider with an artisan command via the command line:
```
php artisan make:provider CalcServiceProvider ```
This is going to create a new file located at `**app/Providers/CalcServiceProvider.php**`
Let’s move this file into our package folder so that way it lives at
```
`packages/monocubed/calc/src/CalcServiceProvider.php` ```
And, don’t forget to change your namespace to be your **`Vendor\\Package\_name`**.
As you can see, in your new service provider class we have 2 methods **boot()** and **register()**.
The public function **boot()** is to boot routes or any other functionality you want to add to your package. It depends on the service provider’s boot method.
The **register()** method is used to bind any classes or functionality into the app container.
Next, you need to add a new Service Provider in your **config/app.php** inside of the providers\[\] array:
```
providers' => [ /* * Application Service Providers... */ ... App\Providers\RouteServiceProvider::class,
monocubed\calc\CalcServicesProvider::class,
], ```
5.
### Add your package routes.php file
Let’s begin with creating new routes.php in your package src directory, and add the below-shown code:
```
php
Route::get(‘calc', function(){
echo 'Hello from the Calc package!';
});
After this include your routes.php file inside the boot() method of your service provider’s boot method.
public function boot()
{ //
include __DIR__.'/routes.php';
} ```
when you run your application by giving route name **calc**, you get following output,
**Hello from the Calc package!**
6.
### Create a Package controller
Now, let’s create a new controller by running the following artisan command:
```
php artisan make:controller CalcController ```
Then let’s move that controller from
```
app/Http/Controllers/CalcController.php to packages/monocubed/calc/src/CalcController.php. ```
Next, create 2 methods **add()** and **subtract()** inside of this controller so the file contents will look like the following:
```
php
namespace monocubed\Calc;
use Illuminate\Http\Request;
use App\Http\Requests;
use App\Http\Controllers\Controller;
class CalcController extends Controller { // public function add($a, $b){ echo $a + $b; }
public function subtract($a, $b){ echo $a - $b; } } ```
Again, remember to change your namespace in your controller above to Vendor\\Package\_name;
Also, take note that we need to include:
```
use App\Http\Controllers\Controller; ```
So that our controller knows which **controller** class to extend from.
Now that we have created our controller we will need to register it. Inside of our Service Provider class in the **register()** method, we will add the following code to register our new controller:
```
public function register()
{ // register our controller $this->app->make('monocubed\Calc\CalcController');
} ```
Finally, let’s add a few more routes to our routes.php file:
```
Route::get('add/{a}/{b}',
'Devdojo\Calc\CalcController@add');
Route::get('subtract/{a}/{b}',
'monocubed\Calc\CalcController@subtract');
```
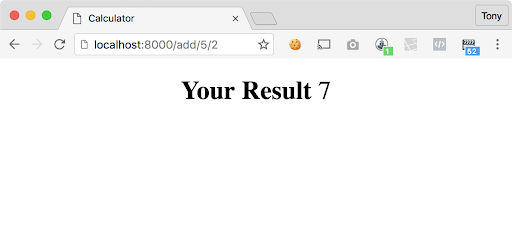
Then if we navigate to **http://localhost:8000/add/5/2** and
**http://localhost:8000/subtract/5/2** we will end up with the following results!

Next, if you want to load a few views from our package. You can do that in such an easy way.
Let’s do that in the next step.
7.
### Add views for the Package
Let’s create a new folder inside of our package src folder called views. Then let’s create a new file and call it **add.blade.php**.
Inside the add.blade.php let’s add the following:
```
Calc<title> </head> <body> <h1 style="text-align:center" > Your Result
{{ $result }} </h1> <body/> </html> ```
<svg viewbox="0 0 24 24" xmlns="http://www.w3.org/2000/svg"><title>Copy to ClipboardNext let’s register where these views should be loaded from by adding a line of code to the register method of our Service Provider:
```
public function register() { // register our controller $this->app->make('monocubed\Calc\CalcController');
$this-> loadViewsFrom(__DIR__.'/views', 'calc');
} ```
Lastly, let’s change the add() function inside of our Calculator controller to call this view:
```
public function add($a, $b){ $result = $a + $b; return view('calculator::add', compact('result')); } ```
And low and behold!
If we load up the following URL http://localhost:8000/add/5/2 in our browser we’ll end up with the following:
This is how you can develop a custom Laravel package or your own packages step by step for your Laravel application.
**How to install your package with a composer?**
If you want to submit it to the package directory so that way you can install your packages with composer you’ll need to do the following steps:
1. Submit your package to [Github](https://github.com/)
2. Submit your package and Github URL to [Packagist](https://packagist.org/)
Then you’ll be able to include your package inside of your main project **composer.json** file and run **composer install** to install your package in your application.
You can also read more about how to publish your views and the service provider extends for a few other advanced topics on publishing your package from the official [laravel documentation](https://laravel.com/docs/packages).
Want to Build a Laravel-based Web Solution?
Let’s validate your idea. Convert it into a reality from a scratch. We have a team of skilled and dedicated Laravel developers.
That’s it.
This is how you can create your own custom Laravel package from scratch.
Want to know more about Laravel and its packages?
## Frequently Asked Questions About Laravel Packages
1.
### What is the basic Package directory structure?
A package directory is the organization of files into a hierarchy of folders. It should not come with fundamental change, it can be added only. Computers were used in the folder named metaphor for decades as a way to help users keep track of where something can be found.
2.
### What is Package JSON in Laravel?
JSON is a default Laravel package. It helps you in making applications by using javascript. For that, it provides Viu and Axios libraries. You can freely remove or add any .json files from any current application building process.
3.
### What is a composer JSON file in Laravel?
Composer.json file is basically a JSON file which is located in the root folder of your PHP application. It is here to identify project common properties, metadata and dependencies. It is the counterpart to .NET files.
4.
### What is modularity in Laravel?
Modular in laravel provides a structure from which you can set up things properly. Using this every module will provide configuration files containing a grouping of classes and have its own route, controllers and models for the Laravel app.
## Conclusion
So, here you learned how to create a Laravel package in 7 steps. Creating a custom Laravel package is an easy process if you do it the same as mentioned in a step. PHP Packages are useful in web app development for the Laravel project.
Being [a leading Laravel web development services provider in Canada](https://www.monocubed.com/services/laravel-development/), we use these packages and make custom web solutions for our clients. We have an in-house team of experienced developers in Laravel web development. Let us know about your ideas regarding your next Laravel project.
---
_View the original post at: [https://www.monocubed.com/blog/laravel-package-development/](https://www.monocubed.com/blog/laravel-package-development/)_
_Served as markdown by [Third Audience](https://github.com/third-audience) v3.6.1_
_Generated: 2026-06-27 08:33:47 UTC_